Day 5 part 2

Introduction to Zbrush Digital Tutors

Adding Materials

– The material palette is found on the left shelf and contains 2 types of materialStandard materials which apply an effect to the model and MatCap materials which simulate specific real-world materials.
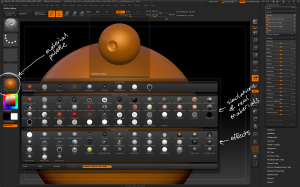
the materials palette conatains 2 types of material that can be applied to models to change the appearance.

the materials palette conatains 2 types of material that can be applied to models to change the appearance.

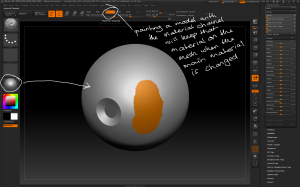
– materials can be polypainted onto a mesh: apply a material then use the M channel to paint on the mesh; when the main material is changed the painted material will remain. Because this is polypainting the border between the materials will be sharp.

materials can be polypainted onto a model using the M channel.

materials can be polypainted onto a model using the M channel.

– To apply a material to the model use the Colour > Fill Object command; the model will keep its material even when a new one is selected in the material palette.

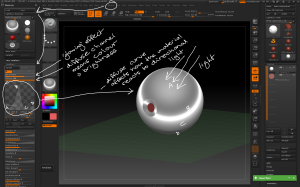
– The Material palette contains ways to modify materials. Common options include Ambient which produces a glowing appearance and Diffuse which affects the brightness of the diffuse colour.

Material > Modifiers > Diffuse Curve can be used to modify the way the colour reacts to the direction of the light, eg have the colour darker on the light-facing side of the model.

The modifiers subpalette contains many options for changing how the material reacts to light

The modifiers subpalette contains many options for changing how the material reacts to light

– Material > Modifiers > Specular affects how shiny the material is. Specular Curve can be altered to affect where the material reflects light.

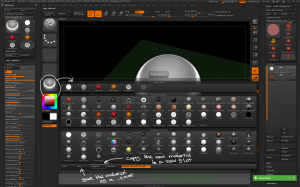
– Once a material has been modified, open the Material Palette to save or copy the material. You can also load new materials.

Modified materials can be saved and copied through the material palette

Modified materials can be saved and copied through the material palette

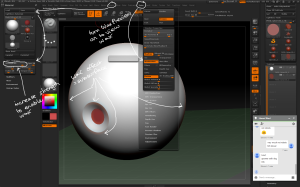
– MatCap materials have different options from standard materials in the Modifiers subpalette.

– Material > Wax Modifier creates a subsurface effect on the material. Use the Wax Modifier > Strength to increase the appearance of the effect.

Wax Modifier contains options for creating a subsurface effect on the material.

Wax Modifier contains options for creating a subsurface effect on the material.

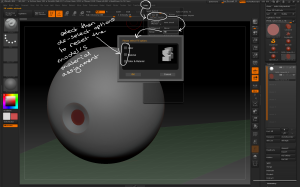
– If you wish to reset the material on the model you can either do a new FillObject or use the Zplugin Subtool Master; select then reselect colour and material and it will totally reset the model, allowing for quick switching between materials without needing to use FillObject.
Use the Zplugin Subtool master's Fill option to reset the material assignments on the model.

Use the Zplugin Subtool master’s Fill option to reset the material assignments on the model.

Day 4

Introduction to Zbrush Digital Tutors

Basic Sculpting

– Sculpting Brushes can be found in the top left of the Left Shelf, or by pressing B.

– Specific brushes can be selected by pressing the first letter of the brush name followed by a specific letter eg to select ClayTubes press B > C > T.

Sculpting brushes can be found in the brush palette or by pressing specific letter combinations.

Sculpting brushes can be found in the brush palette or by pressing specific letter combinations.

– The red rings represent the Draw Size and Focal Shift of the brush, and can be modified using the Draw Size and Focal Shift Sliders. The Draw Size Slider can also be brought up at the cursor position using S, the Focal Shift Slider using O.

– A Focal Shift of 0 will produce a very sharp edged result.

The cursor shows the draw size and focal shift, and can be modified by using sliders or the hotkey S

The cursor shows the draw size and focal shift, and can be modified by using sliders or the hotkey S and O.

– the ZAdd and ZSub buttons change between raising or lowering the mesh when sculpting. Holding Alt + LMB will switch between modes.

– the Z Intensity Slider controls the strength of the brush.

ZAdd and ZSub control what happens when sculpting, while the Z Intensity slider controls the strength of the brush.

ZAdd and ZSub control what happens when sculpting, while the Z Intensity slider controls the strength of the brush.

– By default Shift + LMB is the Smooth Brush which can be used to blend sculpting. Other brushes can also be set to the Shift modifier.

Hold shift to activate the sculpting-smoothing brush, which smooths geometry.

Hold shift to activate the sculpting-smoothing brush, which smooths geometry.

– The Move Brush works by clicking and dragging geometry in or out. It is good for quickly reshaping a mesh but can lead to undesirable geometry if not careful.

The move brush can quickly reshape a model.

The move brush can quickly reshape a model.

Symmetry can be turned on using Transform > Activate Symmetry. Specific Axes can be selected using the X Y Z buttons or the X, Y and Z keys. Symmetry can be axial or radial (use the RadialCount Slider to vary how many instances are sculpted).

Radial and axial symmetry can be switched on to sculpt multiple areas of the mesh at the same time.

Radial and axial symmetry can be switched on to sculpt multiple areas of the mesh at the same time.

– RMB brings up a Quick Menu with many common commands and sliders.

RMB brings up a quick menu with easy access to most of the common drawing and sculpting commands.

RMB brings up a quick menu with easy access to most of the common drawing and sculpting commands.

– Strokes and Alphas can be combined with sculpting brushes to get different results:

– Dots and Freehand produce similar continuous results.

– Spray and ColourSpray apply randomised instances of the brush and alpha.

– DragRect and DragDot allow for precise positioning of alphas on the mesh.

Strokes and alphas can be combined with sculpting brushes to get different effects.

Strokes and alphas can be combined with sculpting brushes to get different effects.

Day 1 Part 3

Introduction to Zbrush Digital Tutors

Pixols and the 2.5D canvas

– a pixol is a pixel that contains colourdepth, and material information.

– open the tool quick menu to select 2.5D brushes. 2.5D brushes can have strokes and alphas applied to them like sculpting brushes.

open the tool quick menu to see the 2.5D brushes.

open the tool quick menu to see the 2.5D brushes.

– pixols can be tranformed using the MoveScale and Rotate buttons. Select Draw to continue drawing in 2.5D.

Pixols drawn on the canvas can be transformed using the move, scale and rotate tools

Pixols drawn on the canvas can be transformed using the move, scale and rotate tools

– use EraserBrush to remove pixols from the canvas.

Use the EraserBrush to remove pixols from the canvas.

Use the EraserBrush to remove pixols from the canvas.

– materials and colours can be changed during the drawing to overwrite pixols already on the canvas.

the material and colour applied to the pixols can be changed during the drawing.

the material and colour applied to the pixols can be changed during the drawing.

– disable Zadd / Zsub during the drawing to avoid adding depth to pixols already on the canvas, only painting with colour and / or material.

– Mrgb allows for changing colour and material of pixols on the canvas without affecting depth.

RGB allows for changing colour of pixols on the canvas without affecting depth or material.

– MrgbRGB buttons can be disabled entirely to allow drawing depth without affecting the colour or material of the pixols.

Use combinations of ZAdd/Zsub, Mrgb and RGB options to draw with different depth, colour and material affects.

Use combinations of ZAdd/Zsub, Mrgb and RGB options to draw with different depth, colour and material affects.

Document > Save As saves the canvas out as an image, not a 3D model.

– SnakeHookBrush allows for dragging out tendrils with depth.

– FibreBrush allows for covering pixols in fibres / hair

Other brushes can be combined to get interesting 2.5D effects

Other brushes can be combined to get interesting 2.5D effects

– SphereBrush always paints with a perfectly round edge, which can be made larger with more pen pressure or larger strokes.

The SphereBrush with different strokes.

The SphereBrush with different strokes.

– AlphaBrush draws in the shape of the current Alpha at a single depth until a new stroke is started.

– Smudge brush can be used to smear pixols around on the canvas. Combining different strokes and alphas will give different effects.

Different effects using the Smudge Brush with different strokes and alphas.

Different effects using the Smudge Brush with different strokes and alphas.

– Hook Brush can be used to pull pixols out. LMB + Anti-clockwise spirals shrinks the pixols, while LMB + Clockwise spirals enlarges them. Hook Brush can be combined with alphas for different effects.

The effects of the Hook Brush using spiral gestures and alphas.

The effects of the Hook Brush using spiral gestures and alphas.