Day 9

Introduction to Zbrush Digital Tutors

Using Panel Loops

– Panel Loops can be used in conjunction with Planes to create structured 3D geometry easily, eg teeth, capes, walls. A 2D plane is used to create the form with limited geometry then converted to a 3D solid.

– eg to create teeth: draw a plane3D then use the Initialize sliders to create the amount of geometry required for the model to be made.
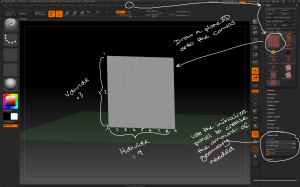
Use the plane3D tool and initialize sliders  to create the base geometry for creating structured objects.

Use the plane3D tool and initialize sliders to create the base geometry for creating structured objects.

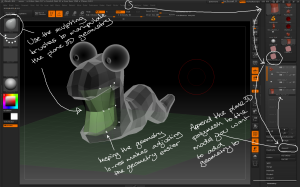
Make PolyMesh3D then append the plane to the model it will be part of. Use the move brush to adjust the position of the geometry. Using as few polygons as possible will make the process easier.

Append the plane3D to the model and use the sculpting tools to create the form.

Append the plane3D to the model and use the sculpting tools to create the form.

– Once the geometry is positioned convert each polygon to a separate object; use the Tool > Polygroups > Group By Normals button with the MaxAngle slider set low then convert each polygon to a separate polygroup.
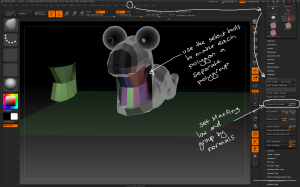
Use the group by normals button and the selection tools to separate each polygon into its own polygroup ready for separating.

Use the group by normals button and the selection tools to separate each polygon into its own polygroup ready for separating.

– Use the Tool > Geometry > EdgeLoop > Panel Loops button to extrude 3D geometry from the plane with the following considerations:

– the Thickness slider determines how thick the 3D geometry is created

– the Polish slider determines how crisp the 3D geometry is

– the Double button extrudes the geometry in both directions

– the Loops slider determines how many loops of polygons there are in the new geometry

– the Bevel slider determines how bevelled the edges of the top and bottom of the new geometry are

– the Elevation slider determines where the origin of the extruded geometry starts, eg elevation = 0 extrudes the geometry equally from either side of the source polygon.
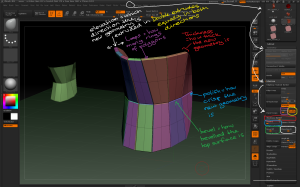
Use the different panel loop settings to vary how the new geometry is created from the source polygons.

Use the different panel loop settings to vary how the new geometry is created from the source polygons.

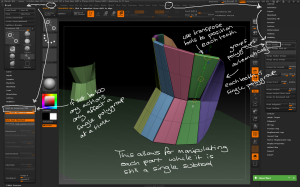
– To modify each tooth individually, use the Tool > Polygroups > Auto Groups button to make each tooth a single polygroup, then use the Brush > Auto Masking > Mask By Polygroups slider set to 100 to ensure any actions only affect a single polygroup. This allows for individual sculpting while the teeth remain a single subtool.
By grouping polygroups and using the auto masking slider you can manipulate individual parts of a model quickly without needing to mask parts.

By grouping polygroups and using the auto masking slider you can manipulate individual parts of a model quickly without needing to mask parts.

Day 4 part 2

Introduction to Zbrush Digital Tutors

Basic Polypainting

Polypainting is colouring a mesh using the polygons rather than a UV-based texture map. Polypainted models can be used to create texture maps, but for high-resolution maps a high-polygon model is required.

– Polypainting uses the same brushes as sculpting, but ZAdd and ZSub should be switched off and the RGB channel switched on.

Polypainting is usually started by switching the Zadd/Zsub buttons off and enabling the Rgb channel, once a base colour has been chosen.

Polypainting is usually started by switching the Zadd/Zsub buttons off and enabling the Rgb channel, once a base colour has been chosen.

– If you try to choose a colour now the whole mesh will change. To start polypainting properly, select Colour > FillObject. The mesh now has a colour applied and new colours can be selected for polypainting.

USe the FillObject button to set the base colour on the model, allowing for polypainting to proceed.

USe the FillObject button to set the base colour on the model, allowing for polypainting to proceed.

– Colour can be combined with strokes and alphas to get different paint effects.

Colour and brushes can be combined with strokes and alphas for many different effects.

Colour and brushes can be combined with strokes and alphas for many different effects.

– to pick a colour from the model, LMB + Drag from the colour palette onto the model. The cursor will change to the Pick symbol.

– Use DragRect stroke with alphas to draw coloured instances of that alpha.

Use the Dragrect stroke to precisely place coloured alphas.

Use the Dragrect stroke to precisely place coloured alphas.

– Rgb Intensity slider determines the strength of the polypainting colour. A higher intensity builds up colour more quickly.

– Sculpting and polypainting can be done at the same time, eg for sculpting boils and pimples.

Use Zadd/Zsub in conjunction with polypainting to sculpt and colour detail in one go.

Use Zadd/Zsub in conjunction with polypainting to sculpt and colour detail in one go.

Day 4

Introduction to Zbrush Digital Tutors

Basic Sculpting

– Sculpting Brushes can be found in the top left of the Left Shelf, or by pressing B.

– Specific brushes can be selected by pressing the first letter of the brush name followed by a specific letter eg to select ClayTubes press B > C > T.

Sculpting brushes can be found in the brush palette or by pressing specific letter combinations.

Sculpting brushes can be found in the brush palette or by pressing specific letter combinations.

– The red rings represent the Draw Size and Focal Shift of the brush, and can be modified using the Draw Size and Focal Shift Sliders. The Draw Size Slider can also be brought up at the cursor position using S, the Focal Shift Slider using O.

– A Focal Shift of 0 will produce a very sharp edged result.

The cursor shows the draw size and focal shift, and can be modified by using sliders or the hotkey S

The cursor shows the draw size and focal shift, and can be modified by using sliders or the hotkey S and O.

– the ZAdd and ZSub buttons change between raising or lowering the mesh when sculpting. Holding Alt + LMB will switch between modes.

– the Z Intensity Slider controls the strength of the brush.

ZAdd and ZSub control what happens when sculpting, while the Z Intensity slider controls the strength of the brush.

ZAdd and ZSub control what happens when sculpting, while the Z Intensity slider controls the strength of the brush.

– By default Shift + LMB is the Smooth Brush which can be used to blend sculpting. Other brushes can also be set to the Shift modifier.

Hold shift to activate the sculpting-smoothing brush, which smooths geometry.

Hold shift to activate the sculpting-smoothing brush, which smooths geometry.

– The Move Brush works by clicking and dragging geometry in or out. It is good for quickly reshaping a mesh but can lead to undesirable geometry if not careful.

The move brush can quickly reshape a model.

The move brush can quickly reshape a model.

Symmetry can be turned on using Transform > Activate Symmetry. Specific Axes can be selected using the X Y Z buttons or the X, Y and Z keys. Symmetry can be axial or radial (use the RadialCount Slider to vary how many instances are sculpted).

Radial and axial symmetry can be switched on to sculpt multiple areas of the mesh at the same time.

Radial and axial symmetry can be switched on to sculpt multiple areas of the mesh at the same time.

– RMB brings up a Quick Menu with many common commands and sliders.

RMB brings up a quick menu with easy access to most of the common drawing and sculpting commands.

RMB brings up a quick menu with easy access to most of the common drawing and sculpting commands.

– Strokes and Alphas can be combined with sculpting brushes to get different results:

– Dots and Freehand produce similar continuous results.

– Spray and ColourSpray apply randomised instances of the brush and alpha.

– DragRect and DragDot allow for precise positioning of alphas on the mesh.

Strokes and alphas can be combined with sculpting brushes to get different effects.

Strokes and alphas can be combined with sculpting brushes to get different effects.