Day 5 part 3

Introduction to Zbrush Digital Tutors

Using Textures

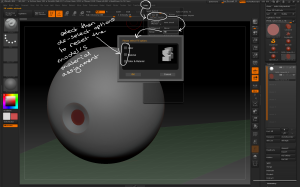
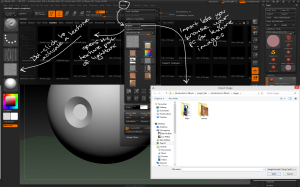
– the Texture menu contains ways to bring new textures into the project; Import allows you to load textures from the computer while Lightbox > Texture lets you pick textures that are already in LightboxDouble-click to make a texture the active one.

Importing textures

Use the texture menu to import texture files from your pc or lightbox.

– To apply a texture to a model a texture map must be created, and there are several ways to do that using the Tool and Texture menus:

– Texture has settings to define the resolution of a new texture map.

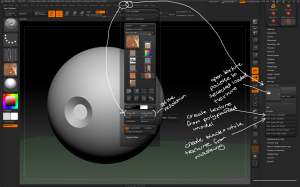
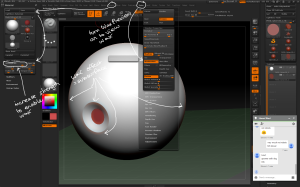
– Tool > Texture Map allows you to create a new texture map for each subtoolTexture maps can be created from polypainting, masking or UV groups.

The tool and texture menus contain several ways to create new texture maps.

The tool and texture menus contain several ways to create new texture maps.

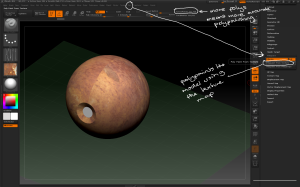
– Tool > Polypaint > Polypaint from Texture applies polypainting to the model based on the texture map. The higher the subdivision level the more accurately the polypainting will be applied.

a model can be polypainted from an applied texture map.

a model can be polypainted from an applied texture map.

– once polypainted the texture can be cleaned up on the model, hiding any seams or modifying to create a new texture map that is better suited to the 3D model.

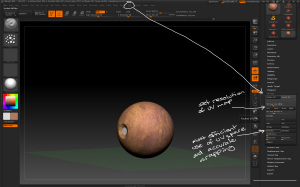
– If you now try to recreate a texture map from the new polypainting it won’t work if the model doesn’t have a UV map applied. To create a UV map go to the lowest subdivision level then go to Tool > UV Map where you can set the size of the new UV map and choose how it’s created. PUVTiles is the most accurate method.

To create a texture map form polypainting the model needs a UV map.

To create a texture map form polypainting the model needs a UV map.

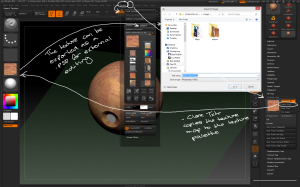
– Tool > Texture Map > Clone Txtr copies the texture map to the texture palette where it can be painted with or exported using Texture > Export.

Texture maps can be exported as PSDs for editing in photoshop.

Texture maps can be exported as PSDs for editing in photoshop.

– Dragrect brush with a texture can be used for eg adding stickers and decals to a model.
Day 5 part 2

Introduction to Zbrush Digital Tutors

Adding Materials

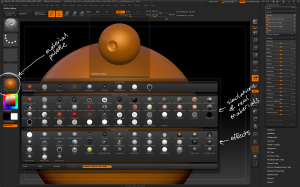
– The material palette is found on the left shelf and contains 2 types of materialStandard materials which apply an effect to the model and MatCap materials which simulate specific real-world materials.

the materials palette conatains 2 types of material that can be applied to models to change the appearance.

the materials palette conatains 2 types of material that can be applied to models to change the appearance.

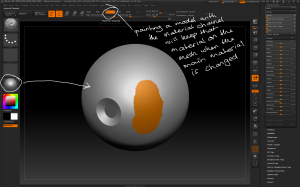
– materials can be polypainted onto a mesh: apply a material then use the M channel to paint on the mesh; when the main material is changed the painted material will remain. Because this is polypainting the border between the materials will be sharp.

materials can be polypainted onto a model using the M channel.

materials can be polypainted onto a model using the M channel.

– To apply a material to the model use the Colour > Fill Object command; the model will keep its material even when a new one is selected in the material palette.

– The Material palette contains ways to modify materials. Common options include Ambient which produces a glowing appearance and Diffuse which affects the brightness of the diffuse colour.

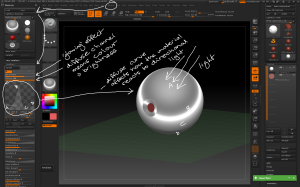
Material > Modifiers > Diffuse Curve can be used to modify the way the colour reacts to the direction of the light, eg have the colour darker on the light-facing side of the model.

The modifiers subpalette contains many options for changing how the material reacts to light

The modifiers subpalette contains many options for changing how the material reacts to light

– Material > Modifiers > Specular affects how shiny the material is. Specular Curve can be altered to affect where the material reflects light.

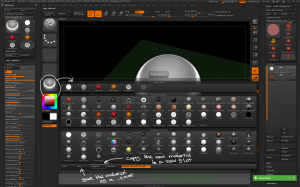
– Once a material has been modified, open the Material Palette to save or copy the material. You can also load new materials.

Modified materials can be saved and copied through the material palette

Modified materials can be saved and copied through the material palette

– MatCap materials have different options from standard materials in the Modifiers subpalette.

– Material > Wax Modifier creates a subsurface effect on the material. Use the Wax Modifier > Strength to increase the appearance of the effect.

Wax Modifier contains options for creating a subsurface effect on the material.

Wax Modifier contains options for creating a subsurface effect on the material.

– If you wish to reset the material on the model you can either do a new FillObject or use the Zplugin Subtool Master; select then reselect colour and material and it will totally reset the model, allowing for quick switching between materials without needing to use FillObject.

Use the Zplugin Subtool master's Fill option to reset the material assignments on the model.

Use the Zplugin Subtool master’s Fill option to reset the material assignments on the model.

Day 4 part 3

Introduction to Zbrush Digital Tutors

Working with Masks

– Hold Ctrl to activate the current Masking BrushCtrl + LMB creates a masked area.

– Masked areas are not affected by sculpting or polypainting while active.

Masked areas are protected from sculpting and polypainting.

Masked areas are protected from sculpting and polypainting.

– Ctrl + Alt + LMB is a Subtractive Mask Brush and can be used to unmask masked areas.

– Ctrl + LMB starting off the model draws a Masking boxCtrl + Alt + LMB makes the box an unmasking box. If the masking box doesn’t touch the model when Ctrl is released any current masks are cleared.

– Hold spacebar while drawing a masking box to drag the box around the screen.

Hold CTrl and drag starting off the model to create a masking box. Ctrl + Alt creates an unmasking box.

Hold CTrl and drag starting off the model to create a masking box. Ctrl + Alt creates an unmasking box.

– Ctrl + Brush palette shows all the masking tools.

– MaskLasso is a freeform tool for quickly creating large masks.

Masklasso quickly creates large freeform masks.

Masklasso quickly creates large freeform masks.

– MaskCurvePen draws a curve that can be dragged around to mask areas.

MaskCurvePen draws out a curve that can be dragged around to mask areas around it.

MaskCurvePen draws out a curve that can be dragged around to mask areas around it.

– MaskCurve draws a straight line mask border. Press Alt while drawing to add a bend to the curve. Hold spacebar at any point to move the MaskCurve.

Maskcurve draws a straight line that masks everything to one side of it. Press ALt to add a curve to the line.

Maskcurve draws a straight line that masks everything to one side of it. Press ALt to add a curve to the line.

– Tool > Masking contains extra options for masks. ViewMask makes the mask invisible without removing it. Inverse flips the mask (can also be done by holding Ctrl + LMB off the model).

– BlurMask and SharpenMask can be used to sharpen or soften the edge of the mask.

– MaskByCavity automatically masks areas deeper than the set depth.

The masking sub-palette in tool has several options for manipulating and creating masks.

The masking sub-palette in tool has several options for manipulating and creating masks.

– Primitives have an extra sub-palette for masking called Mask by Alpha. Start by masking the whole primitive then using the buttons to unmask areas by Row, Col and Grd according to the Sel and Skp settings.

Primitives only can be masked by polygons using the sel and skp settings and grid, row and column buttons.

Primitives only can be masked by polygons using the sel and skp settings and grid, row and column buttons.

– The Move tool can be used to draw out topological masks. Hold Ctrl + LMB starting on the model to mask the whole model along the transpose axis.

Hold Ctrl + Move to drag out a transpose line that masks the whole model.

Hold Ctrl + Move to drag out a transpose line that masks the whole model.

– Ctrl + LMB on masked areas to soften the mask boundary.

Day 4 part 2

Introduction to Zbrush Digital Tutors

Basic Polypainting

Polypainting is colouring a mesh using the polygons rather than a UV-based texture map. Polypainted models can be used to create texture maps, but for high-resolution maps a high-polygon model is required.

– Polypainting uses the same brushes as sculpting, but ZAdd and ZSub should be switched off and the RGB channel switched on.

Polypainting is usually started by switching the Zadd/Zsub buttons off and enabling the Rgb channel, once a base colour has been chosen.

Polypainting is usually started by switching the Zadd/Zsub buttons off and enabling the Rgb channel, once a base colour has been chosen.

– If you try to choose a colour now the whole mesh will change. To start polypainting properly, select Colour > FillObject. The mesh now has a colour applied and new colours can be selected for polypainting.

USe the FillObject button to set the base colour on the model, allowing for polypainting to proceed.

USe the FillObject button to set the base colour on the model, allowing for polypainting to proceed.

– Colour can be combined with strokes and alphas to get different paint effects.

Colour and brushes can be combined with strokes and alphas for many different effects.

Colour and brushes can be combined with strokes and alphas for many different effects.

– to pick a colour from the model, LMB + Drag from the colour palette onto the model. The cursor will change to the Pick symbol.

– Use DragRect stroke with alphas to draw coloured instances of that alpha.

Use the Dragrect stroke to precisely place coloured alphas.

Use the Dragrect stroke to precisely place coloured alphas.

– Rgb Intensity slider determines the strength of the polypainting colour. A higher intensity builds up colour more quickly.

– Sculpting and polypainting can be done at the same time, eg for sculpting boils and pimples.

Use Zadd/Zsub in conjunction with polypainting to sculpt and colour detail in one go.

Use Zadd/Zsub in conjunction with polypainting to sculpt and colour detail in one go.