Day 8

Introduction to Zbrush Digital Tutors

Remeshing Geometry

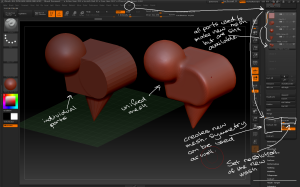
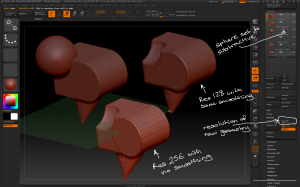
– Zbrush contains tools for creating a new unified mesh from individual parts. Tool > Subtool > Remesh > Remesh all creates a new mesh from everything in the current subtool. Symmetry options can be used to make symmetrical models from asymmetrical subtools.

Subtool > Remesh all can be used to create a single  mesh form a group of objects.

Subtool > Remesh all can be used to create a single mesh form a group of objects.

– Objects within the subtool can be set as additive or subtractive objects for boolean operations.

– The Res slider under Remesh determines the resolution of the new geometry.

Subtools can be used to add or subtract from the new mesh.

Subtools can be used to add or subtract from the new mesh.

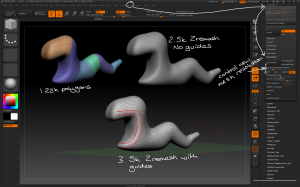
– Tool > Geometry > ZRemesher contains tools for changing the resolution of a mesh or improving the flow of polygons in the geometry, for example making sure the polygon flow on a face follows muscle groups.

– ZRemesher > Target Polygons Count determines how many thousand polygons are in the new mesh. Press ZRemesher to complete the action.

– Use the ZRemesherGuides Brush from the brush palette to lay guidelines for the new mesh. Use the Zremesher > Curve Strength slider to determine how closely the guidelines are followed.

Zremesher can be used to change the resolution and polygon flow of a mesh.

Zremesher can be used to change the resolution and polygon flow of a mesh.

Day 7 part 2

Introduction to Zbrush Digital Tutors

Insert Mesh Techniques

– The Insert Mesh brushes can be used to draw previously created geometry onto an active tool without automatically merging or creating new subtools.

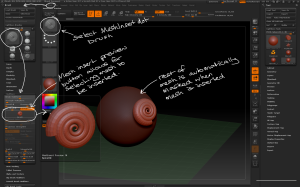
– Brush > MeshInsert Dot allows you to add mesh instances. To define which mesh go to Brush > Modifiers > MeshInsert Preview which brings up the tool palette to select a mesh from. Once a mesh has been selected it can be drawn on the surface of the model.

The InsertMesh Dot brush can be used to add new meshes to the tool once the mesh has been defined.

The InsertMesh Dot brush can be used to add new meshes to the tool once the mesh has been defined.

– When a new mesh is drawn, the rest of the model is automatically masked. This allows you to modify the inserted mesh like dynamesh, but the geometry will still be separate pieces.

– The Tool > Subtool > Split commands can be used to separate out inserted meshes into their own subtools.

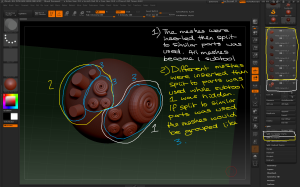
Tool > Subtool > Split > Split to Similar Parts will split all the instances of the same mesh into a single subtool containing all the instances, even if they have been moved and rescaled.

– Tool > Subtool > Split > Split to Parts will split all the visible inserted meshes into individual subtoolsHide any subtools made of inserted meshes before performing this action to control how inserted meshes are grouped.

Inserted meshes can be split off into separate subtools using the split commands.

Inserted meshes can be split off into separate subtools using the split commands.

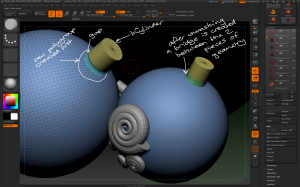
– Some InsertMesh brushes create open geometry which will leave a gap between it and the model. To make joins first create a new polygroup in that area, draw the new InsertMesh then unmask. New geometry will be created to bridge the gap. This is similar to dynamesh but without replacing the existing geometry.

Open geometry can be added and bridged to the existing tool by first creating a new polygroup in that area then unmasking after adding the open geometry.

Open geometry can be added and bridged to the existing tool by first creating a new polygroup in that area then unmasking after adding the open geometry.

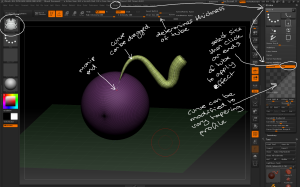
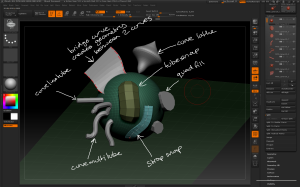
– Curve brushes can be used to create inserted meshesCurveTube creates geometry along a defined curve that can then be manipulated.

– Stroke > Curve Modifiers contains options for changing how the curve creates geometry including tapering. Click on the manipulator ends to apply the effects.

Curve tools can also be used to create inserted geometry.

Curve tools can also be used to create inserted geometry.

Different curve tools can create different geometry.

Different curve tools can create different geometry.

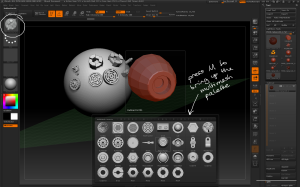
– InsertMultiMesh brushes combine several different meshes into a single brush. When using a MultiMesh brush press M to bring up the MultiMesh palette.

Multi Mesh brushes combine several different meshes into a single brush. The palette can be opened  by pressing M.

Multi Mesh brushes combine several different meshes into a single brush. The palette can be opened by pressing M.

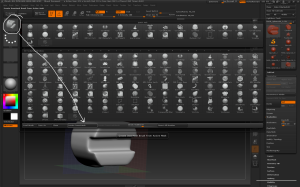
– You can create new insertmesh brushes using Brush > Create InsertMesh. The active tool can then be a new insert mesh brush or appended to an existing multimesh brush.

Any tool can be turned into an InsertMesh brush in the brush palette.

Any tool can be turned into an InsertMesh brush in the brush palette.

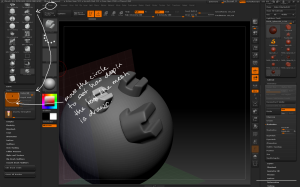
– How deep in the tool the inserted mesh is drawn can be modified using Brush > Depth and moving the circle up and down.

How deep in the tool the mesh is inserted can be modified using the depth setting

How deep in the tool the mesh is inserted can be modified using the depth setting

X / Y / Z / Radial Symmetry can be used when using InsertMesh brushes to quickly add lots of detail across a model.

Day 6 part 3

Introduction to Zbrush Digital Tutors

Mesh Creation SHadowbox

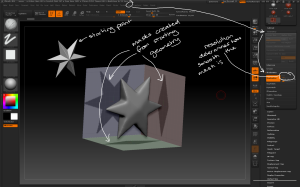
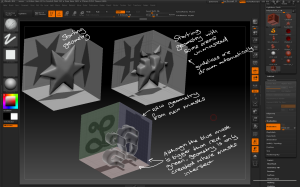
– The SHadowbox is a method for creating geometry that uses masking tools on the inner face of a cube. By applying masks on any face Zbrush creates geometry anywhere the masks intersect.

– To use Shadowbox start with any piece of geometry then go to Tool > Geometry > Shadowbox. A mask will be drawn that matches the piece of geometry.

– Clear the mask by Ctrl + Dragging off the model then begin drawing new masks using the mask tools learned earlier.

Shadowbox can be started form any piece of geometry and creates new geometry using masking tools.

Shadowbox can be started form any piece of geometry and creates new geometry using masking tools.

Modifying existing geometry and creating new geometry form scratch in shadowbox.

Modifying existing geometry and creating new geometry form scratch in shadowbox.

– The Tool > Geometry > Shadowbox > Res slider controls the resolution and therefore quality of the masks and geometry.

– Clipping brushes (Ctrl + Shift) can be used to smooth and refine geometry created with shadowbox.

Day 6 part 2

Introduction to Zbrush Digital Tutors

Working with Subtools

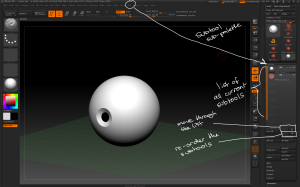
– The Subtool sub-palette is found under the Tool Menu.

– Subtools can be selected from the menu, or navigated through using the selection arrowsSubtools can be re-ordered using the order arrows.

Subtools can be found in the tool palette, and can be navigated and ordered.

Subtools can be found in the tool palette, and can be navigated and ordered.

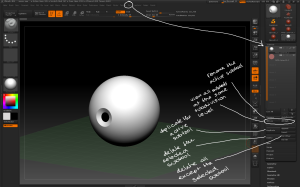
– Subtools can be named using the Rename button; make sure to organise subtools in complex models with good names.

– Tool > Subtool > All Low / All High allows you to view all the subtools at their highest or lowest subdivision levels.

Tool > Subtool > Duplicate creates a new copy of the active subtool in the same position.

– Subtools can be deleted, either with the Delete button which deletes the active subtool or the Del Other which deletes all subtools apart form the active subtool. Neither of these operations can be undone.

The subtool palette contains options for organising, naming and deleting subtools.

The subtool palette contains options for organising, naming and deleting subtools.

– The Tool > Subtool > Split sub-menu contains options to make new subtools from existing geometry:

– Split to similar parts turns any similar geometry into a new subtool. This is useful when using the InsertMesh brush for example adding lots of bolts to a model.

– Split to parts turns and similar geometry into individual subtools. This is useful for individually modifying instances of a common mesh eg teeth.

– Splitting a model into multiple subtools allows you to get a much higher polygon count on the overall model as each subtool has its own subdivision levels.

Subtools can also be merged using the Tool > Subtool > Merge sub-menu. This operation cannot be undone so use with caution!

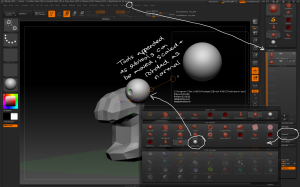
– Tools can be added in as new subtools on an existing model using Tool > Subtool > Append. 3D models can be imported in first using Tool > Import.

Other tools can be added to a model as subtools using the append button.

Other tools can be added to a model as subtools using the append button.

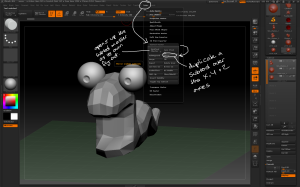
– the Zplugin Subtool Master features many options for manipulating subtools. Mirror allows for mirroring and duplicatingsubtool over the X, Y or Z axis. SUbtools may be appended as new subtools or part of an existing subtool.

Subtools can be mirrored using the subtool master, which also contains other options for manipulating subtools.

Subtools can be mirrored using the subtool master, which also contains other options for manipulating subtools.

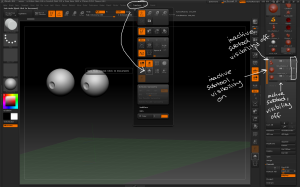
Subtool visibility can be manipulated using the eye icon in the subtool menu; turning the eye off means only the active subtool will be visible. Other subtools can then be switched on and off using the eye on that subtool.  Alternatively, Transform > Solo also achieves this function.

Subtool visibility can be modified in the subtool menu pr by using the solo mode

Subtool visibility can be modified in the subtool menu pr by using the solo mode

– Alt + LMB on a subtool on the canvas to instantly switch to that subtool.

Day 3 part 3

Introduction to Zbrush Digital Tutors

Subdividing Geometry

– Subdivision tools are found under Tool > Geometry.

– Tool > Geometry > Divide or Ctrl + D adds one subdivision layer to the active tool.

– Move up one subdivision layer using or move down one subdivision layer using Shift + D. You can also use the SDiv slider or the Higher Res / Lower Res buttons.

Use the divide button to add subdivision layers that can be moved between using the slider or buttons.

Use the divide button to add subdivision layers that can be moved between using the slider or buttons.

– use the Del Lower / Del Higher to delete subdivision layers. The layers are relative to the current layer.

– Tool > Geometry > Smt smooths the mesh when subdivision layers are added. If this option is turned off polygons are added but the shape of the mesh is not changed.

Turning the Smt modifier off when subdividing adds polygons without changing the shape of the mesh.

Turning the Smt modifier off when subdividing adds polygons without changing the shape of the mesh.

– if the first subdivision layers are added without Smt, then the top layer is added with Smt some smoothing will be added to lower subdivision layers.

– Ztools retain their subdivision layers.

– Low Subdivision models are needed for creating Normal Maps from High Subdivision models.

Tool > Geometry > Freeze Subdivision Levels can be used to retain subdivision information when carrying out operations that normally need a mesh with no subdivision levels.

Day 1 Part 3

Introduction to Zbrush Digital Tutors

Pixols and the 2.5D canvas

– a pixol is a pixel that contains colourdepth, and material information.

– open the tool quick menu to select 2.5D brushes. 2.5D brushes can have strokes and alphas applied to them like sculpting brushes.

open the tool quick menu to see the 2.5D brushes.

open the tool quick menu to see the 2.5D brushes.

– pixols can be tranformed using the MoveScale and Rotate buttons. Select Draw to continue drawing in 2.5D.

Pixols drawn on the canvas can be transformed using the move, scale and rotate tools

Pixols drawn on the canvas can be transformed using the move, scale and rotate tools

– use EraserBrush to remove pixols from the canvas.

Use the EraserBrush to remove pixols from the canvas.

Use the EraserBrush to remove pixols from the canvas.

– materials and colours can be changed during the drawing to overwrite pixols already on the canvas.

the material and colour applied to the pixols can be changed during the drawing.

the material and colour applied to the pixols can be changed during the drawing.

– disable Zadd / Zsub during the drawing to avoid adding depth to pixols already on the canvas, only painting with colour and / or material.

– Mrgb allows for changing colour and material of pixols on the canvas without affecting depth.

RGB allows for changing colour of pixols on the canvas without affecting depth or material.

– MrgbRGB buttons can be disabled entirely to allow drawing depth without affecting the colour or material of the pixols.

Use combinations of ZAdd/Zsub, Mrgb and RGB options to draw with different depth, colour and material affects.

Use combinations of ZAdd/Zsub, Mrgb and RGB options to draw with different depth, colour and material affects.

Document > Save As saves the canvas out as an image, not a 3D model.

– SnakeHookBrush allows for dragging out tendrils with depth.

– FibreBrush allows for covering pixols in fibres / hair

Other brushes can be combined to get interesting 2.5D effects

Other brushes can be combined to get interesting 2.5D effects

– SphereBrush always paints with a perfectly round edge, which can be made larger with more pen pressure or larger strokes.

The SphereBrush with different strokes.

The SphereBrush with different strokes.

– AlphaBrush draws in the shape of the current Alpha at a single depth until a new stroke is started.

– Smudge brush can be used to smear pixols around on the canvas. Combining different strokes and alphas will give different effects.

Different effects using the Smudge Brush with different strokes and alphas.

Different effects using the Smudge Brush with different strokes and alphas.

– Hook Brush can be used to pull pixols out. LMB + Anti-clockwise spirals shrinks the pixols, while LMB + Clockwise spirals enlarges them. Hook Brush can be combined with alphas for different effects.

The effects of the Hook Brush using spiral gestures and alphas.
The effects of the Hook Brush using spiral gestures and alphas.
Day 1 Part 2

Introduction to Zbrush Digital Tutors

Getting Started

– click the large tool icon in the tool palette to open the menu of current tools available. Any meshes that have been imported or created during the project will appear here.

a list of primitives as well as any meshes that have been imported from elsewhere or created during the project.

a list of primitives as well as any meshes that have been imported from elsewhere or created during the project.

– once a tool is selected, drag and release to drop an instance onto the canvas. Although these instances appear 3D and have depth, they are effectively 2D drawings and cannot be edited.

– Ctrl + N clears the canvas of any information.

– press  or select the edit button to manipulate the mesh as a 3D object.

– LMB+drag off the mesh to rotate the view

Alt + LMB off the mesh to pan around the canvas

– Alt + LMB, followed by releasing Alt without releasing LMB allows for zooming the view by dragging forward and backwards.

– turn the floor on and off using the floor button on the right shelf.

– switch between perspective and orthographic views using the perspective button on the right shelf.

use the floor and perspective buttons to disable the floor and switch between perspective and orthographic views.

use the floor and perspective buttons to disable the floor and switch between perspective and orthographic views.

– primitive meshes can’t be sculpted; trying to select a brush and sculpting will result in a pop-up. Use the Make PolyMesh3D button to convert the primitive to an editable polymesh.

use the Make PolyMesh3D button to convert primitive objects into polymeshes that can be sculpted.

use the Make PolyMesh3D button to convert primitive objects into polymeshes that can be sculpted.

– Ctrl + D adds a subdivision layer, allowing for finer sculpting with more polygons. You can also click the divide button under the tool > geometry sub-palette.

– use the SDiv slider to switch between subdivision layers. Found under the tool > geometry sub-palette.

Use the divide button and SDiv slider to add and move between subdivision layers.

Use the divide button and SDiv slider to add and move between subdivision layers.

– use the History slider to undo / redo changes to the model.

– if you deselect edit mode, press Ctrl + N to clear the canvas then re-draw the mesh and press to continue editing the mesh.

– to save out the model use the Save as button to save the model as a Ztool (.ztl).