Day 6 part 2

Introduction to Zbrush Digital Tutors

Working with Subtools

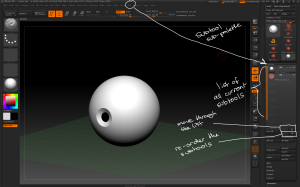
– The Subtool sub-palette is found under the Tool Menu.

– Subtools can be selected from the menu, or navigated through using the selection arrowsSubtools can be re-ordered using the order arrows.

Subtools can be found in the tool palette, and can be navigated and ordered.

Subtools can be found in the tool palette, and can be navigated and ordered.

– Subtools can be named using the Rename button; make sure to organise subtools in complex models with good names.

– Tool > Subtool > All Low / All High allows you to view all the subtools at their highest or lowest subdivision levels.

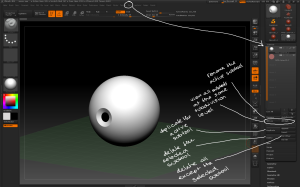
Tool > Subtool > Duplicate creates a new copy of the active subtool in the same position.

– Subtools can be deleted, either with the Delete button which deletes the active subtool or the Del Other which deletes all subtools apart form the active subtool. Neither of these operations can be undone.

The subtool palette contains options for organising, naming and deleting subtools.

The subtool palette contains options for organising, naming and deleting subtools.

– The Tool > Subtool > Split sub-menu contains options to make new subtools from existing geometry:

– Split to similar parts turns any similar geometry into a new subtool. This is useful when using the InsertMesh brush for example adding lots of bolts to a model.

– Split to parts turns and similar geometry into individual subtools. This is useful for individually modifying instances of a common mesh eg teeth.

– Splitting a model into multiple subtools allows you to get a much higher polygon count on the overall model as each subtool has its own subdivision levels.

Subtools can also be merged using the Tool > Subtool > Merge sub-menu. This operation cannot be undone so use with caution!

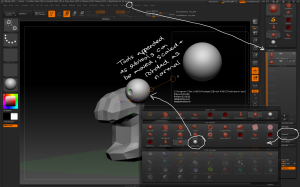
– Tools can be added in as new subtools on an existing model using Tool > Subtool > Append. 3D models can be imported in first using Tool > Import.

Other tools can be added to a model as subtools using the append button.

Other tools can be added to a model as subtools using the append button.

– the Zplugin Subtool Master features many options for manipulating subtools. Mirror allows for mirroring and duplicatingsubtool over the X, Y or Z axis. SUbtools may be appended as new subtools or part of an existing subtool.
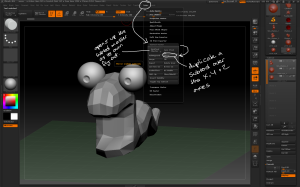
Subtools can be mirrored using the subtool master, which also contains other options for manipulating subtools.

Subtools can be mirrored using the subtool master, which also contains other options for manipulating subtools.

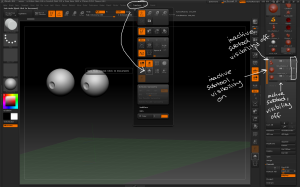
Subtool visibility can be manipulated using the eye icon in the subtool menu; turning the eye off means only the active subtool will be visible. Other subtools can then be switched on and off using the eye on that subtool.  Alternatively, Transform > Solo also achieves this function.

Subtool visibility can be modified in the subtool menu pr by using the solo mode

Subtool visibility can be modified in the subtool menu pr by using the solo mode

– Alt + LMB on a subtool on the canvas to instantly switch to that subtool.
Day 5 part 3

Introduction to Zbrush Digital Tutors

Using Textures

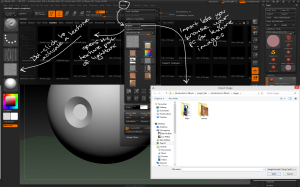
– the Texture menu contains ways to bring new textures into the project; Import allows you to load textures from the computer while Lightbox > Texture lets you pick textures that are already in LightboxDouble-click to make a texture the active one.

Importing textures

Use the texture menu to import texture files from your pc or lightbox.

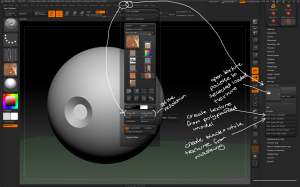
– To apply a texture to a model a texture map must be created, and there are several ways to do that using the Tool and Texture menus:

– Texture has settings to define the resolution of a new texture map.

– Tool > Texture Map allows you to create a new texture map for each subtoolTexture maps can be created from polypainting, masking or UV groups.

The tool and texture menus contain several ways to create new texture maps.

The tool and texture menus contain several ways to create new texture maps.

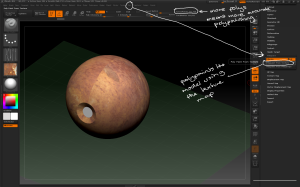
– Tool > Polypaint > Polypaint from Texture applies polypainting to the model based on the texture map. The higher the subdivision level the more accurately the polypainting will be applied.

a model can be polypainted from an applied texture map.

a model can be polypainted from an applied texture map.

– once polypainted the texture can be cleaned up on the model, hiding any seams or modifying to create a new texture map that is better suited to the 3D model.

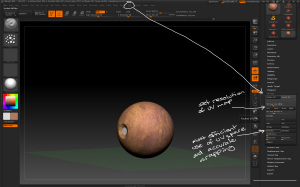
– If you now try to recreate a texture map from the new polypainting it won’t work if the model doesn’t have a UV map applied. To create a UV map go to the lowest subdivision level then go to Tool > UV Map where you can set the size of the new UV map and choose how it’s created. PUVTiles is the most accurate method.

To create a texture map form polypainting the model needs a UV map.

To create a texture map form polypainting the model needs a UV map.

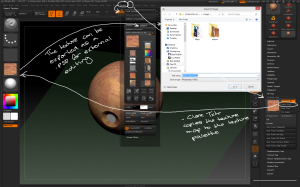
– Tool > Texture Map > Clone Txtr copies the texture map to the texture palette where it can be painted with or exported using Texture > Export.

Texture maps can be exported as PSDs for editing in photoshop.

Texture maps can be exported as PSDs for editing in photoshop.

– Dragrect brush with a texture can be used for eg adding stickers and decals to a model.

Day 3

Introduction to Zbrush Digital Tutors

Setting up reference images

– These steps are specific to this model:

– draw a cylinder primitive

-in the Initialize palette set X and Y size to 20

– in the Deformation palette rotate by 90 degrees in the X axis

– subdivide several time

– Make PolyMesh3D

Preparing the start of the model.

Preparing the start of the model.

– under the Draw Menu there is a palette specifically for grids and reference maps. Options include which faces to assign Maps to (Front-Back, Left-Right, Up-Down), and an option for using one Map for both planes (one).

buttons for assigning reference images to different planes around the model.

buttons for assigning reference images to different planes around the model.

– Map1 / Map2 brings up the texture palette to select an image.

– If the image you wish to use isn’t in the texture palette, go to Texture > Import and the images will be available next time you click on Map1 / Map2. Other options are enabled once a Map is loaded.

"Use

Once an image is imported it can be applied to any of the reference map buttons.

Once an image is imported it can be applied to any of the reference map buttons.

– Draw > Snap > Snap to Mesh snaps the reference map to the size of the mesh on the canvas.

Snap to Mesh makes the reference image the size of the mesh on the canvas.

Snap to Mesh makes the reference image the size of the mesh on the canvas.

– Draw > (F-B/U-D/L-R) > Adjust allows for changing the reference map’s colour, contrast and cropping.

reference maps can be cropped and adjusted within Zbrush.

reference maps can be cropped and adjusted within Zbrush.

– To make the reference map visible through the mesh use Draw > Fill Mode 1 / 2 / 3, or the Front button.

Use the fill mode slider to change how visible the reference map is during sculpting.

Use the fill mode slider to change how visible the reference map is during sculpting.

– once reference maps have been set they can be all switched off at the same time using the floor button on the right shelf.

– Reference images can be created from a model using Draw > Snapshot to Grid, which creates a texture map for each of the six planes.

Use the Snapshot to Grid button to create reference images from a 3D model.

Use the Snapshot to Grid button to create reference images from a 3D model.

Day 2 Part 2

Introduction to Zbrush Digital Tutors

Working with files

– Document > Save As saves just the image on the canvas as a .Zbr file. The image is made of pixols so retains depth, colour and material information so can be edited with 2.5D brushes but the 3D model can no longer be sculpted.

– if selecting to save the document a warning box will pop up asking to confirm whether to save the document or the tool.

Use this option to save a 2.5D pixol image that can be painted. The 3D model can no longer be edited in this document.

Use this option to save a 2.5D pixol image that can be painted. The 3D model can no longer be edited in this document.

– Tool > Save As saves the 3D model as a .Ztl Ztool file that can be re-loaded later for continued sculpting. The Ztool will lose all subtool and material data and become a single 3D model.

Use this option to save the 3D model as a tool that can be later opened and further sculpted..

Use this option to save the 3D model as a tool that can be later opened and further sculpted..

– File > Save As saves the project as a .Zpr file, which includes all tools, materials, sub-tools and history.

Save the entire project including all subtools, materials and history.

Save the entire project including all subtools, materials and history.

– file sizes decrease as .Zpr > .Ztl > .Zdoc.

– information saved decreases as .Zpr > .Ztl > .Zdoc.

– Quicksave (9) creates an incremental project save that won’t overwrite manual saves.

Preferences > Quicksave palette contains options for quicksaves, including:

– Maximum Duration determines how frequently in minutes Zbrush will quicksave.

– Rest Duration sets Zbrush to quicksave after a set time of no activity in minutes.

– Skip History creates quicksaves with undo history included.

The quicksave palette contains settings for quicksave frequency and size.

The quicksave palette contains settings for quicksave frequency and size.

– quicksaves are saved to Users > Public Documents > Zbrush Data and can also be found under Lightbox > Quicksaves.

quicksaves with thumbnails can be found under Lightbox

quicksaves with thumbnails can be found under Lightbox

– Tool > Import allows for importing .Obj files for 3D models created in other applications as tools. The tools can then be saved as Documents, projects or Ztools.