Day 8 part 2

Introduction to Zbrush Digital Tutors

Projecting Detail onto Meshes

– Zbrush can project the sculpted detail from one mesh to another. This can be useful for transferring the detail from a multi-subtool model to a single-skin model for eg 3D printing. It is also useful for transferring detail that has been previously sculpted on another model to a new model.

– Tool > Subtool > Project > ProjectAll transfers the details from any visible subtools onto the active subtool. Before projecting make sure the target mesh has enough resolution for the projected detail.

Sculpting and polypainting can be transferred from one model to another using the project tools.

Sculpting and polypainting can be transferred from one model to another using the project tools.

– Project > Dist Slider determines how deep below the surface of the target mesh Zbrush can look for sculpted detail to project. If there are artefacts on the target model increase the distance.

– The projected detail is applied throughout the subdivision levels of the target mesh.

If the detail isn't properly transferred try increasing the distance Zbrush looks for detail.

If the detail isn’t properly transferred try increasing the distance Zbrush looks for detail.

Day 6 part 2

Introduction to Zbrush Digital Tutors

Working with Subtools

– The Subtool sub-palette is found under the Tool Menu.

– Subtools can be selected from the menu, or navigated through using the selection arrowsSubtools can be re-ordered using the order arrows.

Subtools can be found in the tool palette, and can be navigated and ordered.

Subtools can be found in the tool palette, and can be navigated and ordered.

– Subtools can be named using the Rename button; make sure to organise subtools in complex models with good names.

– Tool > Subtool > All Low / All High allows you to view all the subtools at their highest or lowest subdivision levels.

Tool > Subtool > Duplicate creates a new copy of the active subtool in the same position.

– Subtools can be deleted, either with the Delete button which deletes the active subtool or the Del Other which deletes all subtools apart form the active subtool. Neither of these operations can be undone.

The subtool palette contains options for organising, naming and deleting subtools.

The subtool palette contains options for organising, naming and deleting subtools.

– The Tool > Subtool > Split sub-menu contains options to make new subtools from existing geometry:

– Split to similar parts turns any similar geometry into a new subtool. This is useful when using the InsertMesh brush for example adding lots of bolts to a model.

– Split to parts turns and similar geometry into individual subtools. This is useful for individually modifying instances of a common mesh eg teeth.

– Splitting a model into multiple subtools allows you to get a much higher polygon count on the overall model as each subtool has its own subdivision levels.

Subtools can also be merged using the Tool > Subtool > Merge sub-menu. This operation cannot be undone so use with caution!

– Tools can be added in as new subtools on an existing model using Tool > Subtool > Append. 3D models can be imported in first using Tool > Import.

Other tools can be added to a model as subtools using the append button.

Other tools can be added to a model as subtools using the append button.

– the Zplugin Subtool Master features many options for manipulating subtools. Mirror allows for mirroring and duplicatingsubtool over the X, Y or Z axis. SUbtools may be appended as new subtools or part of an existing subtool.

Subtools can be mirrored using the subtool master, which also contains other options for manipulating subtools.

Subtools can be mirrored using the subtool master, which also contains other options for manipulating subtools.

Subtool visibility can be manipulated using the eye icon in the subtool menu; turning the eye off means only the active subtool will be visible. Other subtools can then be switched on and off using the eye on that subtool.  Alternatively, Transform > Solo also achieves this function.

Subtool visibility can be modified in the subtool menu pr by using the solo mode

Subtool visibility can be modified in the subtool menu pr by using the solo mode

– Alt + LMB on a subtool on the canvas to instantly switch to that subtool.

Day 5 part 3

Introduction to Zbrush Digital Tutors

Using Textures

– the Texture menu contains ways to bring new textures into the project; Import allows you to load textures from the computer while Lightbox > Texture lets you pick textures that are already in LightboxDouble-click to make a texture the active one.

Importing textures

Use the texture menu to import texture files from your pc or lightbox.

– To apply a texture to a model a texture map must be created, and there are several ways to do that using the Tool and Texture menus:

– Texture has settings to define the resolution of a new texture map.

– Tool > Texture Map allows you to create a new texture map for each subtoolTexture maps can be created from polypainting, masking or UV groups.

The tool and texture menus contain several ways to create new texture maps.

The tool and texture menus contain several ways to create new texture maps.

– Tool > Polypaint > Polypaint from Texture applies polypainting to the model based on the texture map. The higher the subdivision level the more accurately the polypainting will be applied.

a model can be polypainted from an applied texture map.

a model can be polypainted from an applied texture map.

– once polypainted the texture can be cleaned up on the model, hiding any seams or modifying to create a new texture map that is better suited to the 3D model.

– If you now try to recreate a texture map from the new polypainting it won’t work if the model doesn’t have a UV map applied. To create a UV map go to the lowest subdivision level then go to Tool > UV Map where you can set the size of the new UV map and choose how it’s created. PUVTiles is the most accurate method.

To create a texture map form polypainting the model needs a UV map.

To create a texture map form polypainting the model needs a UV map.

– Tool > Texture Map > Clone Txtr copies the texture map to the texture palette where it can be painted with or exported using Texture > Export.

Texture maps can be exported as PSDs for editing in photoshop.

Texture maps can be exported as PSDs for editing in photoshop.

– Dragrect brush with a texture can be used for eg adding stickers and decals to a model.

Day 5

Introduction to Zbrush Digital Tutors

Working with Polygroups

– Polygons can be hidden at any time, holding Ctrl + Shift  activates the SelectRect tool; dragging a rectangle then releasing hides everything that isn’t in the green box.

Ctrl + Shift enables the selection tool, which hides everything outside the selection box.

Ctrl + Shift enables the selection tool, which hides everything outside the selection box.

– Ctrl + Shift + LMB click outside the model reveals the hidden polygons – Ctrl + Shift + Drag outside the model inverts the visibility, revealing the hidden polygons and hiding the visible polygons. – Ctrl + Shift + Alt hides any polygons in the red box.

Ctrl + SHift + Alt hides any polygons inside the red box.

Ctrl + SHift + Alt hides any polygons inside the red box.

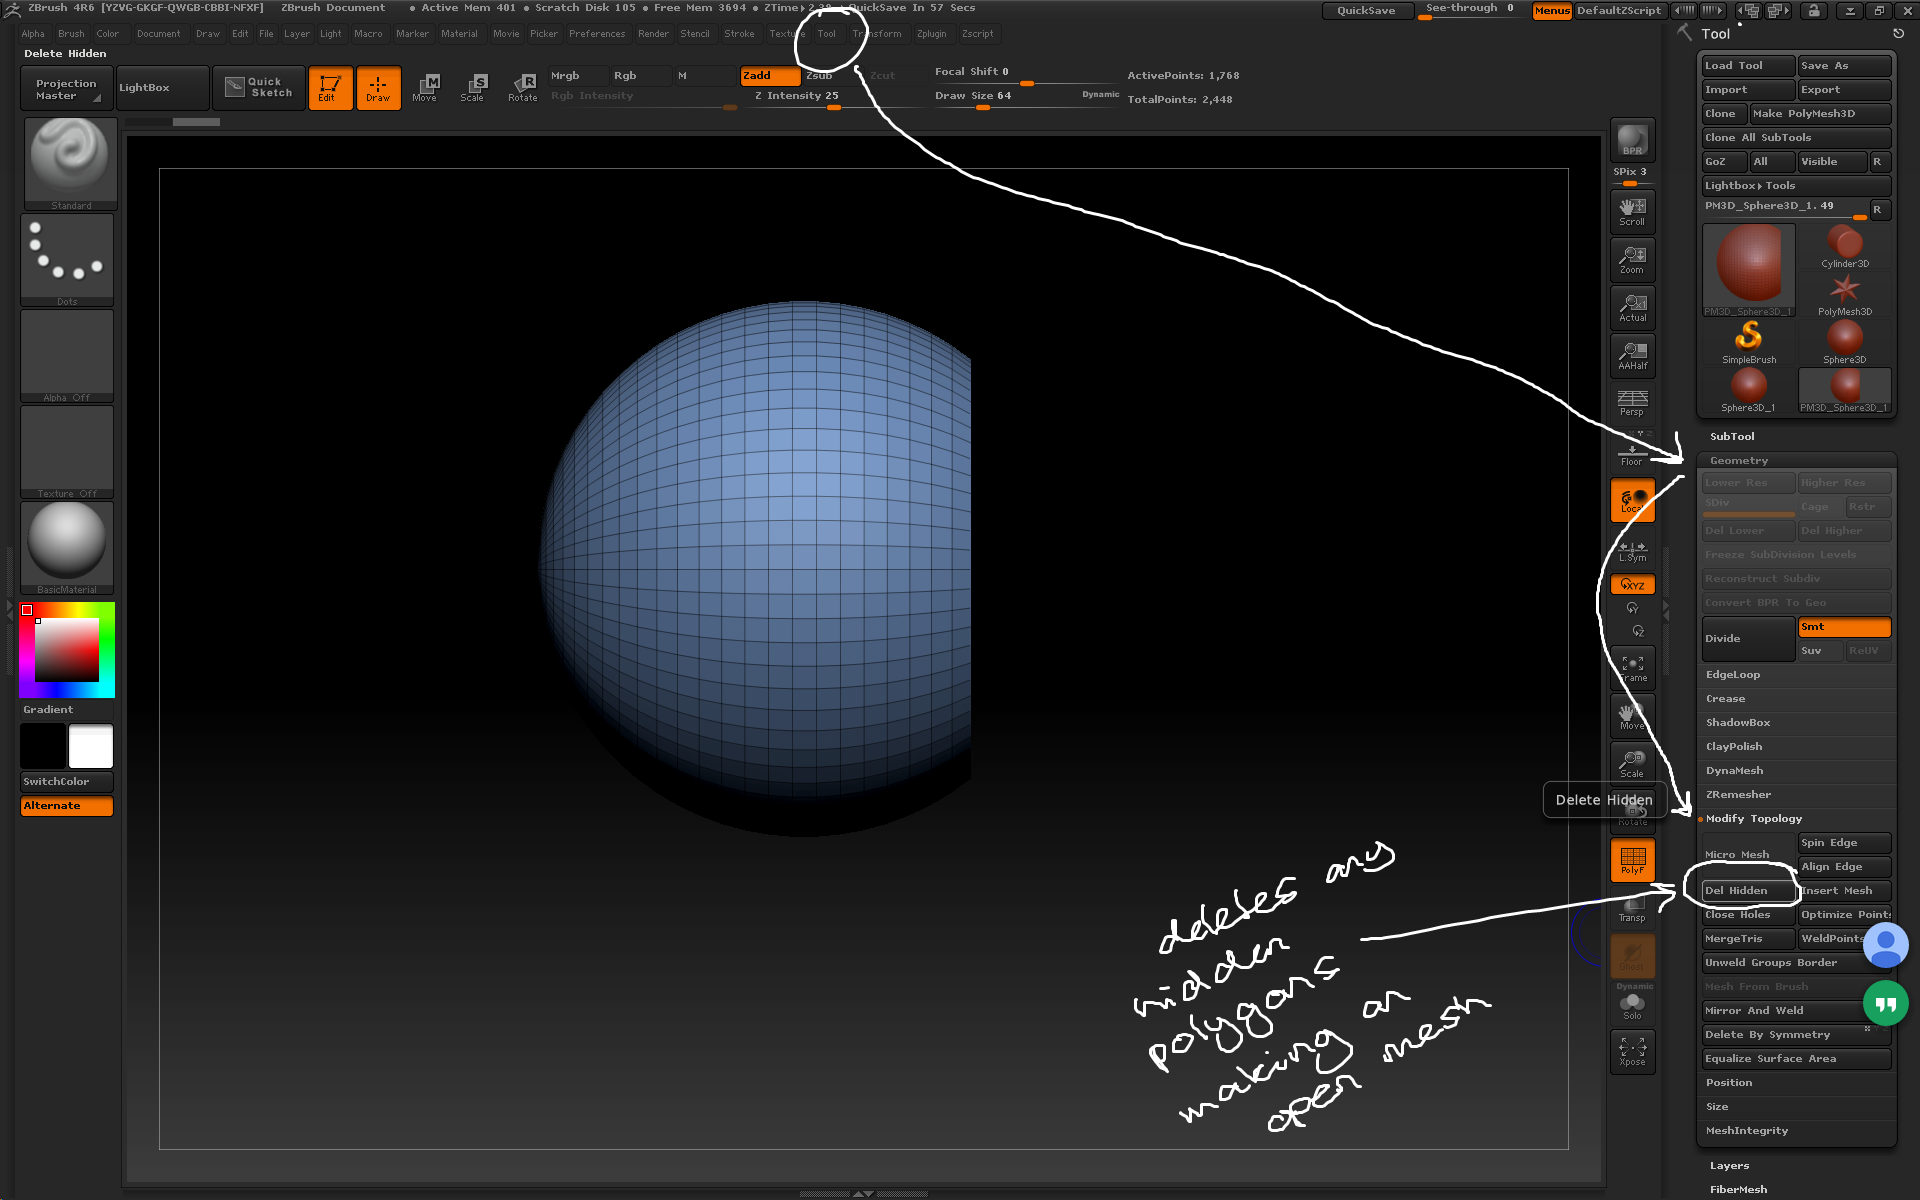
– models can be modified once polygons are hidden eg Tool > Geometry > Delete Hidden will delete any hidden polygons, making an open mesh.

– Polygroups are a quick and easy way to handle visibility by hiding entire parts of a model with a single click. – There are several tools to create a polygroup which can be found under Tool > Polygroups: the easiest way is by selecting some polygons then pressing Ctrl + W which assigns any visible polygons to a new polygroup.

– other options for creating polygroups include From Masking which converts any masked polygons into a new polygroup and Group Front which merges any polygons facing the camera.

POlygroups can be made based on visibility, colour or masking using these tools.

POlygroups can be made based on visibility, colour or masking using these tools.

– Ctrl + Shift + LMB on a polygroup hides every other polygroupCtrl + Shift + LMB on the visible polygroup again to hide that group and reveal the hidden groups.

– Polygroups created at a low subdivision level are retained at higher subdivision levels.

– Polygroups can be made by masking areas then pressing Ctrl + W. This works the same as Tool > Polygroups > Group Masked.

– Use the PolishGroups slider next to Tool > Polygroups > Group Masked to create smooth-edged polygroups at higher subdivision levels. This modifies the geometry around the polygroup.

The polishgroups slider can be used to create smooth-edged polygroups from masked areas at the expense of deforming geometry.

The polishgroups slider can be used to create smooth-edged polygroups from masked areas at the expense of deforming geometry.

– Slice tools can be used to quickly create polygroups: Ctrl + Shift brings up the Slice tool menu.

Slice tools can be used to quickly create lots of polygroups on a model.

Slice tools can be used to quickly create lots of polygroups on a model.

– Holding Ctrl with the transpose tool selected eg Move or Rotate then clicking on a polygroup aligns the transpose tool with the normal of that polygroup while masking all other groups. Holding Shift while dragging the transpose line moves just that polygroup along the transpose axis.

An example of using polygroups and the transpose tool to manipulate a mesh.

An example of using polygroups and the transpose tool to manipulate a mesh.

POlygroups can be used to easily break a mesh into subtools by hiding a polygroup then using the Tool > Subtools > Split > Split Hidden command. The hidden polygroup is separated into a separate piece of geometry.

POlygroups can be used to create subtools by selectively hiding polygroups.

POlygroups can be used to create subtools by selectively hiding polygroups.

– POlygroups can be used to maintain crisp edges when subdividing using the Tool > Geometry > Edgeloop > Edgeloop command: Hide all but the desired polygroup, select the crisp button then press edgeloop. A new ring of polygons is added around the polygroup close to the border. Now when the model is subdivided this edge will stay sharper.

POlygroups and the edgeloop tool can be used to create features that stay crisp-edged even when the model is heavily subdivided.

POlygroups and the edgeloop tool can be used to create features that stay crisp-edged even when the model is heavily subdivided.

Day 3 part 3

Introduction to Zbrush Digital Tutors

Subdividing Geometry

– Subdivision tools are found under Tool > Geometry.

– Tool > Geometry > Divide or Ctrl + D adds one subdivision layer to the active tool.

– Move up one subdivision layer using or move down one subdivision layer using Shift + D. You can also use the SDiv slider or the Higher Res / Lower Res buttons.

Use the divide button to add subdivision layers that can be moved between using the slider or buttons.

Use the divide button to add subdivision layers that can be moved between using the slider or buttons.

– use the Del Lower / Del Higher to delete subdivision layers. The layers are relative to the current layer.

– Tool > Geometry > Smt smooths the mesh when subdivision layers are added. If this option is turned off polygons are added but the shape of the mesh is not changed.

Turning the Smt modifier off when subdividing adds polygons without changing the shape of the mesh.

Turning the Smt modifier off when subdividing adds polygons without changing the shape of the mesh.

– if the first subdivision layers are added without Smt, then the top layer is added with Smt some smoothing will be added to lower subdivision layers.

– Ztools retain their subdivision layers.

– Low Subdivision models are needed for creating Normal Maps from High Subdivision models.

Tool > Geometry > Freeze Subdivision Levels can be used to retain subdivision information when carrying out operations that normally need a mesh with no subdivision levels.

Day 1 Part 2

Introduction to Zbrush Digital Tutors

Getting Started

– click the large tool icon in the tool palette to open the menu of current tools available. Any meshes that have been imported or created during the project will appear here.

a list of primitives as well as any meshes that have been imported from elsewhere or created during the project.

a list of primitives as well as any meshes that have been imported from elsewhere or created during the project.

– once a tool is selected, drag and release to drop an instance onto the canvas. Although these instances appear 3D and have depth, they are effectively 2D drawings and cannot be edited.

– Ctrl + N clears the canvas of any information.

– press  or select the edit button to manipulate the mesh as a 3D object.

– LMB+drag off the mesh to rotate the view

Alt + LMB off the mesh to pan around the canvas

– Alt + LMB, followed by releasing Alt without releasing LMB allows for zooming the view by dragging forward and backwards.

– turn the floor on and off using the floor button on the right shelf.

– switch between perspective and orthographic views using the perspective button on the right shelf.

use the floor and perspective buttons to disable the floor and switch between perspective and orthographic views.

use the floor and perspective buttons to disable the floor and switch between perspective and orthographic views.

– primitive meshes can’t be sculpted; trying to select a brush and sculpting will result in a pop-up. Use the Make PolyMesh3D button to convert the primitive to an editable polymesh.

use the Make PolyMesh3D button to convert primitive objects into polymeshes that can be sculpted.

use the Make PolyMesh3D button to convert primitive objects into polymeshes that can be sculpted.

– Ctrl + D adds a subdivision layer, allowing for finer sculpting with more polygons. You can also click the divide button under the tool > geometry sub-palette.

– use the SDiv slider to switch between subdivision layers. Found under the tool > geometry sub-palette.

Use the divide button and SDiv slider to add and move between subdivision layers.

Use the divide button and SDiv slider to add and move between subdivision layers.

– use the History slider to undo / redo changes to the model.

– if you deselect edit mode, press Ctrl + N to clear the canvas then re-draw the mesh and press to continue editing the mesh.

– to save out the model use the Save as button to save the model as a Ztool (.ztl).